An introduction to XPath: How to get started
Let's start with what is XPath? XPath is a powerful language that is often used for scraping the web. It allows you to select nodes or compute values from an XML or HTML document and is actually one of the languages that you can use to extract web data using Scrapy.
The other is CSS and while CSS selectors are a popular choice, XPath can actually allow you to do more.
With XPath, you can extract data based on text elements' contents, and not only on the page structure. So when you are scraping the web and you run into a hard-to-scrape website, XPath may just save the day (and a bunch of your time!).
This is an introductory XPath tutorial will walk you through the basic concepts of XPath, crucial to a good understanding of it, before diving into more complex use cases.
Note: You can use the XPath playground to experiment with XPath. Just paste the HTML samples provided in this post and play with the expressions.
The basics
Consider this HTML document:
Plain text
Copy to clipboard
Open code in new window
EnlighterJS 3 Syntax Highlighter
<html>
<head>
<title>My page</title>
</head>
<body>
<h2>Welcome to my <a href="#">page</a></h2>
<p>This is the first paragraph.</p>
My pageWelcome to my page
This is the first paragraph.
XPath handles any XML/HTML document as a tree. This tree's root node is not part of the document itself. It is in fact the parent of the document element node (<html> in case of the HTML above). This is how the XPath tree for the HTML document looks like:
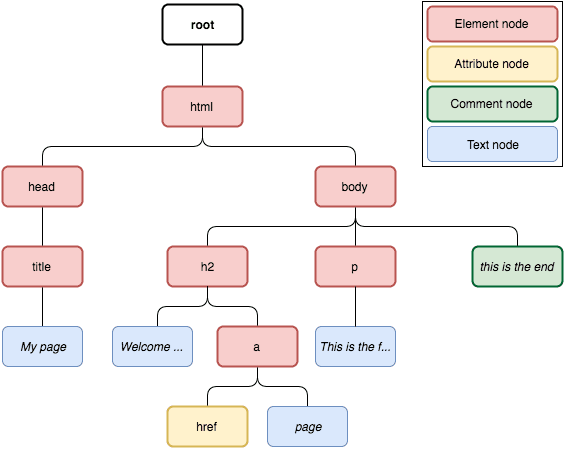
As you can see, there are many node types in an XPath tree:
- Element node: represents an HTML element, a.k.a an HTML tag.
- Attribute node: represents an attribute from an element node, e.g. “href” attribute in
<a href=”http://www.example.com”>example</a>. - Comment node: represents comments in the document (
<!-- … -->). - Text node: represents the text enclosed in an element node (
examplein<p>example</p>).
Distinguishing between these different types is useful to understand how XPath expressions work. Now let's start digging into XPath.
Here is how we can select the title element from the page above using an XPath expression:
/html/head/title
This is what we call a location path. It allows us to specify the path from the context node (in this case the root of the tree) to the element we want to select, as we do when addressing files in a file system. The location path above has three location steps, separated by slashes. It roughly means: start from the ‘html’ element, look for a ‘head’ element underneath, and a ‘title’ element underneath that ‘head’. The context node changes in each step. For example, the head node is the context node when the last step is being evaluated.
However, we usually don't know or don’t care about the full explicit node-by-node path, we just care about the nodes with a given name. We can select them using:
//title
This means: look in the whole tree, starting from the root of the tree (//) and select only those nodes whose name matches title. In this example, // is the axis and title is the node test.
In fact, the expressions we've just seen are using XPath's abbreviated syntax. Translating //title to the full syntax we get:
/descendant-or-self::node()/child::title
So, // in the abbreviated syntax is short for descendant-or-self, which means the current node or any node below it in the tree. This part of the expression is called the axis and it specifies a set of nodes to select from, based on their direction on the tree from the current context (downwards, upwards, on the same tree level). Other examples of axes are parent, child, ancestor, etc -- we’ll dig more into this later on.
The next part of the expression, node(), is called a node test, and it contains an expression that is evaluated to decide whether a given node should be selected or not. In this case, it selects nodes from all types. Then we have another axis,childwhich means go to the child nodes from the current context, followed by another node test, which selects the nodes named as title.
So, the axis defines where in the tree the node test should be applied and the nodes that match the node test will be returned as a result.
You can test nodes against their name or against their type.
Here are some examples of name tests:
| Expression | Meaning |
|---|---|
| /html | Selects the node named html, which is under the root. |
| /html/head | Selects the node named head, which is under the html node. |
| //title | Selects all the title nodes from the HTML tree. |
| //h2/a | Selects all a nodes that are directly under an h2 node. |
And here are some examples of node type tests:
| Expression | Meaning |
|---|---|
| //comment() | Selects only comment nodes. |
| //node() | Selects any kind of node in the tree. |
| //text() | Selects only text nodes, such as "This is the first paragraph". |
| //* | Selects all nodes, except comment and text nodes. |
We can also combine name and node tests in the same expression. For example:
//p/text()
This expression selects the text nodes from inside p elements. In the HTML snippet shown above, it would select "This is the first paragraph.".
Now, let’s see how we can further filter and specify things. Consider this HTML document:
Plain text
Copy to clipboard
Open code in new window
EnlighterJS 3 Syntax Highlighter
<html>
<body>
<ul>
<li>Quote 1</li>
<li>Quote 2 with <a href="...">link</a></li>
<li>Quote 3 with <a href="...">another link</a></li>
<li><h2>Quote 4 title</h2> ...</li>
</ul>
</body>
</html>
- Quote 1
- Quote 2 with link
- Quote 3 with another link
Quote 4 title
...
- Quote 1
- Quote 2 with link
- Quote 3 with another link
Quote 4 title
...
Say we want to select only the first li node from the snippet above. We can do this with:
//li[position() = 1]
The expression surrounded by square brackets is called a predicate and it filters the node-set returned by //li (that is, all li nodes from the document) using the given condition. In this case, it checks each node's position using the position() function, which returns the position of the current node in the resulting node-set (notice that positions in XPath start at 1, not 0). We can abbreviate the expression above to:
//li[1]
Both XPath expressions above would select the following element:
Check out a few more predicate examples:
| Expression | Meaning |
|---|---|
| //li[position()%2=0] | Selects the li elements at even positions. |
| //li[a] | Selects the li elements that enclose an a element. |
| //li[a or h2] | Selects the li elements that enclose either an a or an h2 element. |
| //li[ a [ text() = "link" ] ] | Selects the li elements that enclose an a element whose text is "link". Can also be written as //li[ a/text()="link" ]. |
| //li[last()] | Selects the last li element in the document. |
So, a location path is basically composed of steps, which are separated by / and each step can have an axis, a node test, and a predicate. Here we have an expression composed of two steps, each one with axis, node test, and predicate:
//li[ 4 ]/h2[ text() = "Quote 4 title" ]
And here is the same expression, written using the non-abbreviated syntax:
/descendant-or-self::node()
/child::li[ position() = 4 ]
/child::h2[ text() = "Quote 4 title" ]
We can also combine multiple XPath expressions in a single one using the union operator |. For example, we can select all a and h2 elements in the document above using this expression:
//a | //h2
Now, consider this HTML document:
Plain text
Copy to clipboard
Open code in new window
EnlighterJS 3 Syntax Highlighter
<html>
<body>
<ul>
<li><a href="https://scrapinghub.com"\>Scrapinghub</a></li>
<li><a href="https://blog.scrapinghub.com"\>Scrapinghub Blog</a></li>
</ul>
</body>
</html>
Say we want to select only the a elements whose link points to an HTTPS URL. We can do it by checking their href attribute:
//a[starts-with(@href, "https")]
This expression first selects all the a elements from the document and for each of those elements, it checks whether their href attribute starts with "https". We can access any node attribute using the @attributename syntax.
Here we have a few additional examples using attributes:
| Expression | Meaning |
|---|---|
| //a[@href="https://scrapy.org"\] | Selects the a elements pointing to https://scrapy.org. |
| //a/@href | Selects the value of the href attribute from all the a elements in the document. |
| //li[@id] | Selects only the li elements that have an id attribute. |
More on axes
We've seen only two types of axes so far:
- descendant-or-self
- child
But there's plenty more where they came from and we'll see a few examples. Consider this HTML document:
Plain text
Copy to clipboard
Open code in new window
EnlighterJS 3 Syntax Highlighter
<html> <body> <p>Intro paragraph</p> <h1>Title #1
A random paragraph #1
Title #2
A random paragraph #2
Another one #2
A single paragraph, with no markupIntro paragraph
Title #1
A random paragraph #1
Title #2
A random paragraph #2
Another one #2
A single paragraph, with no markupIntro paragraph
Title #1
A random paragraph #1
Title #2
A random paragraph #2
Another one #2
A single paragraph, with no markupNow we want to extract only the first paragraph after each of the titles. To do that, we can use the following-sibling axis, which selects all the siblings after the context node. Siblings are nodes who are children of the same parent, for example, all children nodes of the body tag are siblings. This is the expression:
//h1/following-sibling::p[1]
In this example, the context node where the following-sibling axis is applied to is each of the h1 nodes from the page.
What if we want to select only the text that is right before the footer? We can use the preceding-sibling axis:
//div[@id='footer']/preceding-sibling::text()[1]
In this case, we are selecting the first text node before the div footer ("A single paragraph, with no markup").
XPath also allows us to select elements based on their text content. We can use such a feature, along with the parent axis, to select the parent of the p element whose text is "Footer text":
//p[ text()="Footer text" ]/..
The expression above selects <div id="footer"><p>Footer text</p></div>. As you may have noticed, we used .. here as a shortcut to the parent axis.
As an alternative to the expression above, we could use:
//*[p/text()="Footer text"]
It selects, from all elements, the ones that have a p child which text is "Footer text", getting the same result as the previous expression.
You can find additional axes in the XPath specification: https://www.w3.org/TR/xpath/#axes
Wrapping up this XPath tutorial
XPath is very powerful and this post is just an introduction to the basic concepts. If you want to learn more about it, check out these resources:
- http://zvon.org/comp/r/tut-XPath_1.html
- http://fr.slideshare.net/scrapinghub/xpath-for-web-scraping
- XPath tips from the web scraping trenches
And stay tuned, because we will post a series with more XPath tips from the trenches in the following months.

Learn from the leading web scraping developers
A discord community of over 3000 web scraping developers and data enthusiasts dedicated to sharing new technologies and advancing in web scraping.