How to deploy custom docker images for your web crawlers
[UPDATE]: Please see this article for an up-to-date version.
What if you could have complete control over your environment? Your crawling environment, that is... One of the many benefits of our upgraded production environment, Scrapy Cloud 2.0, is that you can customize your crawler runtime environment via Docker images. It’s like a superpower that allows you to use specific versions of Python, Scrapy and the rest of your stack, deciding if and when to upgrade.
With this new feature, you can tailor a Docker image to include any dependency your crawler might have. For instance, if you wanted to crawl JavaScript-based pages using Selenium and PhantomJS, you would have to include the PhantomJS executable somewhere in the PATH of your crawler's runtime environment.
And guess what, we’ll be walking you through how to do just that in this post.
Heads up, while we have a forever free account, this feature is only available for paid Scrapy Cloud users. The good news is that it’s easy to upgrade your account. Just head over to the Billing page on Scrapy Cloud.
Using a custom image to run a headless browser
Download the sample project or clone the GitHub repo to follow along.
Imagine you created a crawler to handle website content that is rendered client-side via Javascript. You decide to use selenium and PhantomJS. However, since PhantomJS is not installed by default on Scrapy Cloud, trying to deploy your crawler the usual way would result in this message showing up in the job logs:
1selenium.common.exceptions.WebDriverException: Message: 'phantomjs' executable needs to be in PATH.
2
3`selenium.common.exceptions.WebDriverException: Message: 'phantomjs' executable needs to be in PATH.`PhantomJS, which is a C++ application, needs to be installed in the runtime environment. You can do this by creating a custom Docker image that downloads and installs the PhantomJS executable.
Building a custom Docker image
First you have to install a command line tool that will help you with building and deploying the image:
1$ pip install shubBefore using shub, you have to include scrapinghub-entrypoint-scrapy in your project's requirements file, which is a runtime dependency of Scrapy Cloud.
1$ echo scrapinghub-entrypoint-scrapy >> ./requirements.txtOnce you have done that, run the following command to generate an initial Dockerfile for your custom image:
1$ shub image init --requirements ./requirements.txtIt will ask you whether you want to save the Dockerfile, so confirm by answering Y.
Now it’s time to include the installation steps for PhantomJS binary in the generated Dockerfile. All you need to do is copy the highlighted code below and put it in the proper place inside your Dockerfile:
Plain text
Copy to clipboard
Open code in new window
EnlighterJS 3 Syntax Highlighter
FROM python:2.7
RUN apt-get update -qq && \
apt-get install -qy htop iputils-ping lsof ltrace strace telnet vim && \
rm -rf /var/lib/apt/lists/*
RUN wget -q https://bitbucket.org/ariya/phantomjs/downloads/phantomjs-2.1.1-linux-x86\_64.tar.bz2 && \
tar -xjf phantomjs-2.1.1-linux-x86_64.tar.bz2 && \
mv phantomjs-2.1.1-linux-x86_64/bin/phantomjs /usr/bin && \
rm -rf phantomjs-2.1.1-linux-x86_64.tar.bz2 phantomjs-2.1.1-linux-x86_64
ENV TERM xterm
ENV PYTHONPATH $PYTHONPATH:/app
ENV SCRAPY_SETTINGS_MODULE demo.settings
RUN mkdir -p /app
WORKDIR /app
COPY ./requirements.txt /app/requirements.txt
RUN pip install --no-cache-dir -r requirements.txt
COPY . /app
FROM python:2.7 RUN apt-get update -qq && \ apt-get install -qy htop iputils-ping lsof ltrace strace telnet vim && \ rm -rf /var/lib/apt/lists/* RUN wget -q https://bitbucket.org/ariya/phantomjs/downloads/phantomjs-2.1.1-linux-x86\_64.tar.bz2 && \ tar -xjf phantomjs-2.1.1-linux-x86_64.tar.bz2 && \ mv phantomjs-2.1.1-linux-x86_64/bin/phantomjs /usr/bin && \ rm -rf phantomjs-2.1.1-linux-x86_64.tar.bz2 phantomjs-2.1.1-linux-x86_64 ENV TERM xterm ENV PYTHONPATH $PYTHONPATH:/app ENV SCRAPY_SETTINGS_MODULE demo.settings RUN mkdir -p /app WORKDIR /app COPY ./requirements.txt /app/requirements.txt RUN pip install --no-cache-dir -r requirements.txt COPY . /app
1FROM python:2.7
2RUN apt-get update -qq && \\
3    apt-get install -qy htop iputils-ping lsof ltrace strace telnet vim && \\
4    rm -rf /var/lib/apt/lists/\*
5RUN wget -q https://bitbucket.org/ariya/phantomjs/downloads/phantomjs-2.1.1-linux-x86\_64.tar.bz2 && \\
6    tar -xjf phantomjs-2.1.1-linux-x86\_64.tar.bz2 && \\
7    mv phantomjs-2.1.1-linux-x86\_64/bin/phantomjs /usr/bin && \\
8    rm -rf phantomjs-2.1.1-linux-x86\_64.tar.bz2 phantomjs-2.1.1-linux-x86\_64
9ENV TERM xterm
10ENV PYTHONPATH $PYTHONPATH:/app
11ENV SCRAPY\_SETTINGS\_MODULE demo.settings
12RUN mkdir -p /app
13WORKDIR /app
14COPY ./requirements.txt /app/requirements.txt
15RUN pip install --no-cache-dir -r requirements.txt
16COPY . /appThe Docker image you're going to build with shub has to be uploaded to a Docker registry. I used Docker Hub, the default Docker registry, to create a repository under my user account:
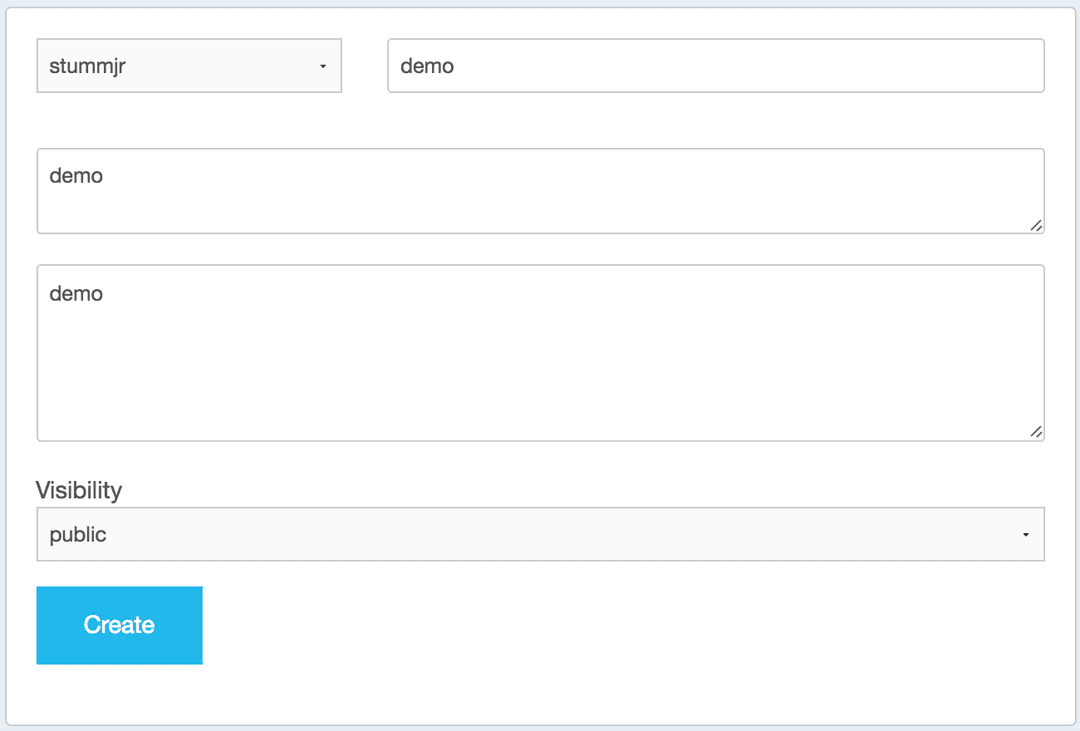
Once this is done, you have to define the images setting in your project's scrapinghub.yml (replace stummjr/demo with your own):
Plain text
Copy to clipboard
Open code in new window
EnlighterJS 3 Syntax Highlighter
projects:
default: PUT_YOUR_PROJECT_ID_HERE
requirements_file: requirements.txt
images:
default: stummjr/demo
projects: default: PUT_YOUR_PROJECT_ID_HERE requirements_file: requirements.txt images: default: stummjr/demo
1projects:
2    default: PUT\_YOUR\_PROJECT\_ID\_HERE
3requirements\_file: requirements.txt
4images:
5 default: stummjr/demoThis will tell shub where to push the image once it’s built and also where Scrapy Cloud should pull the image from when deploying.
Now that you have everything configured as expected, you can build, push and deploy the Docker image to Scrapy Cloud. This step may take a couple minutes, so now might be a good time to go grab a cup of coffee. 🙂
Plain text
Copy to clipboard
Open code in new window
EnlighterJS 3 Syntax Highlighter
$ shub image upload --username stummjr --password NotSoEasy
The image stummjr/demo:1.0 build is completed.
Pushing stummjr/demo:1.0 to the registry.
The image stummjr/demo:1.0 pushed successfully.
Deploy task results:
You can check deploy results later with 'shub image check --id 1'.
Deploy results:
{u'status': u'progress', u'last_step': u'pulling'}
{u'status': u'ok', u'project': 98162, u'version': u'1.0', u'spiders': 1}
$ shub image upload --username stummjr --password NotSoEasy The image stummjr/demo:1.0 build is completed. Pushing stummjr/demo:1.0 to the registry. The image stummjr/demo:1.0 pushed successfully. Deploy task results: You can check deploy results later with 'shub image check --id 1'. Deploy results: {u'status': u'progress', u'last_step': u'pulling'} {u'status': u'ok', u'project': 98162, u'version': u'1.0', u'spiders': 1}
1$ shub image upload --username stummjr --password NotSoEasy
2The image stummjr/demo:1.0 build is completed.
3Pushing stummjr/demo:1.0 to the registry.
4The image stummjr/demo:1.0 pushed successfully.
5Deploy task results:
6You can check deploy results later with 'shub image check --id 1'.
7Deploy results:
8{u'status': u'progress', u'last\_step': u'pulling'}
9{u'status': u'ok', u'project': 98162, u'version': u'1.0', u'spiders': 1}If everything went well, you should now be able to run your PhantomJS spider on Scrapy Cloud. If you followed along with the sample project from the GitHub repo, your crawler should have collected 300 quotes scraped from the page that was rendered with PhantomJS.
Wrap Up
You now officially know how to use custom Docker images with Scrapy Cloud to supercharge your crawling projects. For example, you might want to do OCR using Tesseract in your crawler. Now you can, it's just a matter of creating a Docker image with the Tesseract command line tool and pytesseract installed. You can also install tools from apt repositories and even compile the libraries/tools that you want.
Warning: this feature is still in beta, so be aware that some Scrapy Cloud features, such as addons, dependencies and settings, still don't work with custom images.
For further information, check out the shub documentation.
Feel free to comment below with any other ideas or tips you’d like to hear more about!
This feature is a perk of paid accounts, so painlessly upgrade to unlock custom docker images for your projects. Just head over to the Billing page on Scrapy Cloud.